Export Corridor
Icon: |
Introduction
This commands exports/recreates the corridor from a Civil Site Design/Corridor EZ model. All Strings and Codes in the Civil Site Design/Corridor EZ model will be used. The command will:
-
Create a list of all the strings and cross section codes used in the Civil Site Design/Corridor EZ model.
-
Create Civil 3D profiles for each String
-
Create assemblies and subassemblies to cater for changes in the cross sections of each String (managed via the Exchange Settings command)
-
Create additional alignments and strings for road edges
-
Create a Corridor for the selected Civil Site Design/Corridor EZ model:
-
Creating baselines for each design String
-
Adding regions and applying assemblies, based on the applied Variations and Template changes
-
Apply Target Mapping to road edges, curb returns and cul-de-sacs, as well as for some Variations (as per the Corridor Settings command).
-
Apply Parameter Overrides as required for subassembly widths and elevations to match the Civil Site Design/Corridor EZ model
-
The command stores the name of the Corridor created - the Manage Corridors command will allow recreating a created corridor.
Applying Assemblies, Target Mapping or Parameter Overrides
The software will determine whether to apply Assemblies, Target Mapping or Parameter Overrides to the corridor, depending on the edits made to the cross sections.
-
Assembies. These are created:
-
For the start of each String
-
When when Codes are removed or added to the cross sections. This is achieved by applying any of the following variations
-
Insert Section
-
Delete Section
-
Delete Sections Outside Selected Code
-
Conditionally Delete Sections
-
Dual Section Batters (Ditches)
-
-
When adding a Table Drain (Ditch) entry along the length of the String
-
At intersections and where cul-de-sacs or knuckles start/stop (because Codes are being added/removed from the sections)
-
-
Target Mapping. These are created:
-
When a Code variation is applied to widen a code onto an alignment
-
When a Code variation is applied to set a Code to adopt the offset and elevation of another String
-
when a Code is set to adopt the offset of a polyline (the software will programmatically create an alignment using the polyline geometry
-
-
Parameter Overrides. These are created:
-
When you apply Variations that manually adjust the crossfall or width based on user typed inputs, such as:
-
Linearly Vary Section Slope or Width
-
Match Code to Surface
-
Match Slopes
-
-
When you add a Batter (Daylight) override
-
Mesh Refinement
When a surface is created from a Model, the software adds additional sampling through vertical curves to improve vertical curve accuracy. If Mesh Refinement is unticked, standard sampling is applied through vertical curves.
Requirements
Before creating the corridor, a Civil Site Design/Corridor EZ Model must be created. The Auto Model command will create 'TotalModel', which creates a model containing road, curb return, cul-de-sac, knuckle and roundabout strings. Models can be created using any combination of strings and codes via the Model Builder command.
Any strings created from an alignment (Road, curb return, cul-de-sac, knuckle, roundabout or profile) can be placed in a model and included in the Export Corridor command.
Grading strings are created from polylines and are not included in the Export Corridor command.
Details
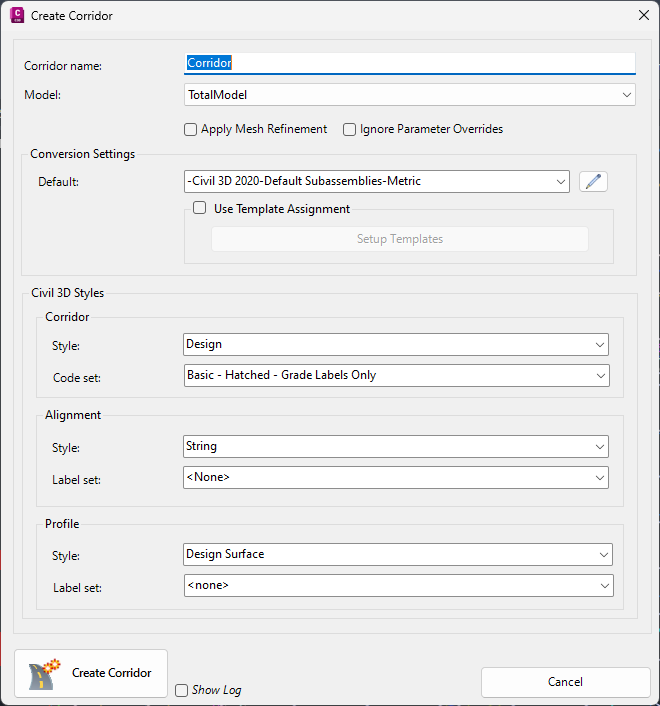
Upon selecting the command the following form is displayed:
|
|
|||||||||||||
|
Corridor name |
Type in a name for the corridor to be created. If the same name is used for a corridor already created, the assemblies and corridor will be recreated. |
||||||||||||
|
Model |
Use the picklist to select the Civil Site Design/Corridor EZ model to use for exporting the corridor | ||||||||||||
|
Apply Mesh Refinement |
Adds additional sampling through vertical curves when creating the corridor model | ||||||||||||
| Ignore Parameter Overrides | Toggle on to prevent the software from applying parameter overrides to the corridor | ||||||||||||
|
Conversion Settings |
Establishes the 'rules' for creating assemblies for Civil Site Design/Corridor EZ templates applied to strings and cross section codes. | ||||||||||||
|
Default Conversion File picklist |
Select the default conversion file to use for creating Civil 3D subassemblies. This will be applied if 'Use Tample Assignment' is unticked. | ||||||||||||
|
|
Edits the selected conversion file by opening the Exchange Settings command. | ||||||||||||
|
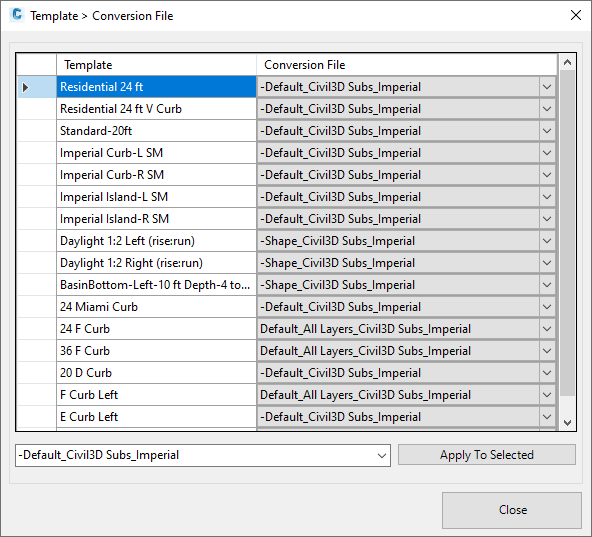
Use Template Assignment |
If ticked on, the Setup Templates form is activated to allow assignment of different conversion files per
Civil Site Design/Corridor EZ template. If unticked, the Default conversion file is applied. |
||||||||||||
|
Setup Templates |
When clicked the following form is displayed:
|
||||||||||||
|
Civil 3D Styles |
Set the styles to apply when creating the corridor, alignments and profiles. | ||||||||||||
|
Corridor |
|||||||||||||
|
Style |
Pick the Style to apply to the Corridor | ||||||||||||
|
Code Set |
Pick the Code Set to apply to the Corridor | ||||||||||||
|
Alignment |
|||||||||||||
|
Style |
Pick the Style to apply to the created alignments | ||||||||||||
|
Label Set |
Pick the Label Set to apply to the created alignments | ||||||||||||
|
Profile |
|||||||||||||
|
Style |
Pick the Style to apply to the created profiles | ||||||||||||
|
Label Set |
Pick the Code Set to apply to the created profiles | ||||||||||||
|
Export Corridor |
Create the assemblies and corridor in the drawing. | ||||||||||||
|
Show Log |
Tick on to generate a Notepad file detailing all codes found and calculations for the corridor. | ||||||||||||
|
Cancel |
Exit the form without deleting any data. |
||||||||||||