Export HECRAS 2D
Icon: ![]()
Ribbon: Roads Tab > Select Panel > Model Viewer dropdown > Export HECRAS 2D
HECRAS Tab > 2D HECRAS Panel > Export HECRAS 2D
Model Viewer: Model Viewer > Analysis Tab > > HECRAS 2D Panel > Export HECRAS 2D
Introduction
HECRAS 5.0 supports 2D flood modelling. In order to use HECRAS for 2D flood modelling it is required to load in a Terrain, usually via import of a GeoTIFF (.tiff) file. The GeoTIFF includes terrain data (elevations) in the image, which is read into HECRAS and used to construct a surface model. Once a surface is included, users can include flows into HECRAS and apply 2 dimensional flow analysis across the surface with a variety of storms. Users select where the storm inputs are inserted along the surface boundary, and the outlet conditions for the surface.
This command allows users to export any surface created in Civil Site Design, or Civil 3D, as a GeoTIFF file for import into HECRAS.
This command can be started from the menu/ribbon environment in the CAD application, or directly via Model Viewer. However the command is started, the export process is executed via Model Viewer.
After analysis in HEC-RAS, the results can be viewed inside Model Viewer via the Import HECRAS 2D command. Users can view any time stamp and assess the flow outcomes - the play button can be used to view 'real time' the development of the storm outputs over time.
Below is a short video describing the export process, analysis in HECRAS, and export back to Model Viewer.
<<Video>>
Pre-Requisites
In order for this command to run, it is required that a Civil Site Design, or Civil 3D, surface be created in the drawing.
Model Viewer is used to package the surface for export to a HECRAS import format. HECRAS supports elevation data in a grid format - it is recommended that users familiarise themselves with the accuracy of the data being imported so they pick a grid size commensurate with the surface data. Too big a size will result in loss of accuracy in HECRAS, whereas too small a grid will add unnecessary data and slow down the processing.
It is recommended that users firstly review the surface in Model Viewer to confirm appropriate inputs.
Combining Design and Existing Terrain
In Model Viewer, the overall surface display is exported as a single Combined Surface to HECRAS. If one or more design surfaces is displayed along with the existing (base) surface, then the output to HECRAS will be the combination of these surfaces into a single surface. Model Viewer effectively pastes all surfaces (design and existing) into one overall surface at the time of export to HECRAS.
Surfaces displayed in Model Viewer are exported as a single surface to HECRAS:
-
Toggling the design surfaces OFF will display only the base (existing) surface in Model Viewer. Exporting to HECRAS at this time would result in only the existing surface elevations going across to HECRAS for analysis.
-
Toggling the design surface/s ON will display both the base (existing) surface and the design surface/s 'pasted into' the existing. Exporting to HECRAS at this time would result in a single surface representing the combining of the design and existing surfaces going across to HECRAS for analysis
Command run from CAD - Model Viewer and Toggle Display
If Model Viewer has not previously been run, or the Export HECRAS 2D command is run from the CAD application, users will firstly confirm the surface/s to be exported using the Toggle Display form in Model Viewer.
Limitations
HECRAS supports the inclusion of areas across the surface where different Mannings n values can be applied. Currently this would be done manually in HECRAS.
Inclusion of boundary conditions (incoming flows and outgoing flows) must be applied directly in HECRAS.
Details
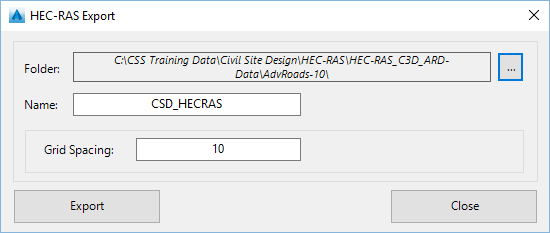
Upon selecting the command the following form is displayed:
- If the command is started from the CAD ribbon/menu/toolbar commands, the Model Viewer Toggle Display form will open. Once the surface/s are selected, including surface materials/styles, the HEC-RAS Export form (below) will display.
- If the command is started from inside Model Viewer, the HEC-RAS Export form (below) will display.
|
|
|
|
Folder |
Select the folder to save the output surface data (geotiff) to. By default the output is to the data folder of the current project. Click on the ... button to select a different folder (directory) to save the output surface file to. |
|
Name |
Users can name the surface to export for into HEC-RAS. |
|
Grid Spacing |
Type in the grid spacing for the exported surface. The grid is oriented horizontally and vertically, relative to the World Coordinate system. Bottom left corner of the surface is the position of the bottom left corner of the first grid. Elevations are stored along the grid edges and included in the surface (geotiff) export. |
|
OK |
Creates the surface data file (geotiff). A progress bar displays to show users the progress of the export. The path to the output file is copied to clipboard, to assist in locating the filepath when selecting the output .tiff file inside HECRAS. |
|
Close |
Exits the form. |
Next Step - Analysis in HECRAS
This help system is not intended to cover the analysis process in HECRAS. Please refer to the video above for the essential steps in a HECRAS 2D analysis.