Create Points
Icon: |
Introduction
Create individual COGO Points in your drawing as Blocks with assigned Attributes based on the Point Style and the Point Format settings. Points can optionally be setup using a dynamic reference to a String Code and/or a Surface to acquire its level.
Creating Points this way can be helpful to add data to a Point Group Surface or to place a marker (and text) showing information such as Chainage and Offset along an alignment, Coordinates, Surface Elevation and Level Differences between two surfaces at a specified point.
NOTE: When using this command and 'snapping' on an object in the drawing, the COGO point will automatically adopt the elevation from the object snapped, if the user has opted to set the point elevation via manual input.
About Point Descriptions
When adding a Code, users are in effect setting a Description for the point. The Code (Description) is useful for many core functions:
It can be used to control the data in the Point Groups as a value to filter in or out. For example, the Contourable Point Group will have an Exclude argument to remove any COGO Points with the GRID* Code so they are not added to the Surface generated by that Point Group.
A Code Set Table is selected at the time of creating points, If the Description matches in the Code Set Table, a Point Style, layer and Description format is applied.
-
The Description can be split into inputs to control the points (via the Point Formats) - the description could contain the formatted Code (raw description), a scale and/or a rotation for the point for example.
-
When points are edited, the formatted Code can be separately edited (rather than editing the entire description)
-
The Codes are used for connecting Survey Strings.
About Comparing Surfaces (Calculate Second Elevation)
This form enables the level differences to be shown between two surfaces. In order for this calculation to be made, users need to apply a Property Subtraction in the Point Property List for a Point Style. An example of this adjustment to a Point Property (the Elevation parameter) is shown, below:
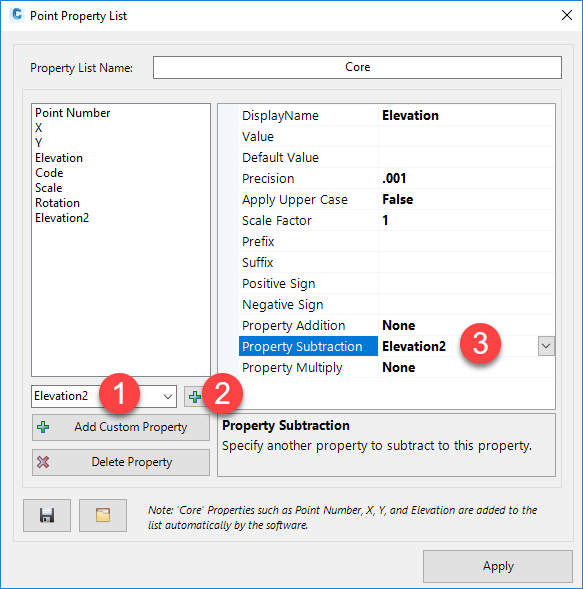
When there is an Elevation2 subtraction on the Elevation point property, as shown above, this will be used to calculate the elevation difference when users tick on for Calculate Second Elevation in this command.
Details
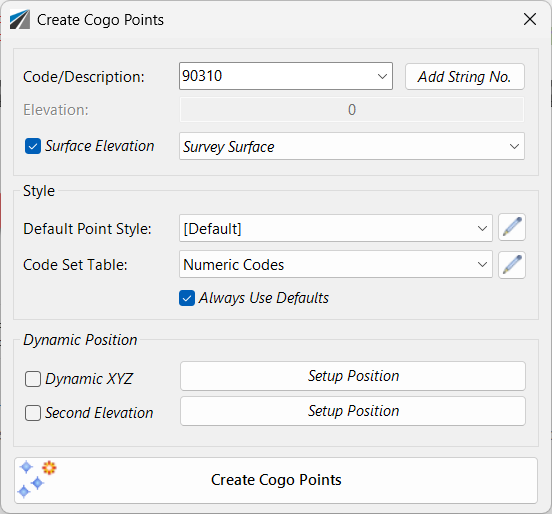
Upon selecting the command the following form is displayed:
|
|
Code/Description |
Set the COGO Code here. This entry will typically appear as the Description field of a COGO Point Block. The picklist can be used to select a Code from the Code Set Table selected. Overtyping can also be used to type in any Code |
Add String No. |
If a Survey String Group has been created, this will append a unique String Number to the Code/Description |
Elevation |
Type in an elevation if required |
Surface Elevation tick box |
Tick on to adopt elevations from a surface. It ticked on, use the pick list to select a surface. |
Style |
Set the Point Style to apply for the created point/s. |
Default Point Style |
Select a Point Style for display of the point. If a Point Style is selected, the Code Set Table picklist will turn blank, so it is not applied. |
|
Click to open the Point Style Editor to create/edit/manage Point Styles. |
Code Set Table |
Select a Code Set Table to apply a Point Style, Layer and Description formatting based on a matching Code. |
|
Click to open the Code Set Table to create/edit/manage point codes for auto assignment of styles, layers and description formatting. |
Always Use Defaults |
If ticked on, the software sets the Defautl Point Style from the settings. If unticked, the Default Point Style is recalled from the last time this form was opened |
Dynamic Position |
Set up dynamic x,y,z position of the point |
Use Dynamic Position |
Tick this on to establish the point location/elevation related to other Design object/s |
Dynamic XYZ |
Tick on to set point position based on other objects. |
Setup Position |
This opens the Positioning Form to establish the x,y,z location of the point. |
Second Elevation |
Tick on to apply a second elevation. |
Setup Postion |
This opens the Positioning Form to establish the elevation of the point. |
Create COGO Points |
Click
to create COGO Points. Note: the command will repeat until the esc button is pressed on the keyboard |