Volume Reports
| Icon: | |
| Menu: | Surfaces > Surface Volume Reports |
| Ribbon: | Surfaces Tab > Outputs Panel > Volume Reports |
Introduction
This command provides users with the ability to generate volume reports between surfaces. This is a TIN to TIN comparison - in the background the software creates a TIN surface representing the level difference between the two surfaces (an isopach surface) to calculate the volume.
Multiple volume comparisons can be created between different surfaces. The user then selects a comparison from the list and generates a report which is displayed in an output view panel on the right of the form. This data can be copied and pasted into any text based application (eg: Word, Notepad).
Details
Upon selecting the command the following form is displayed:
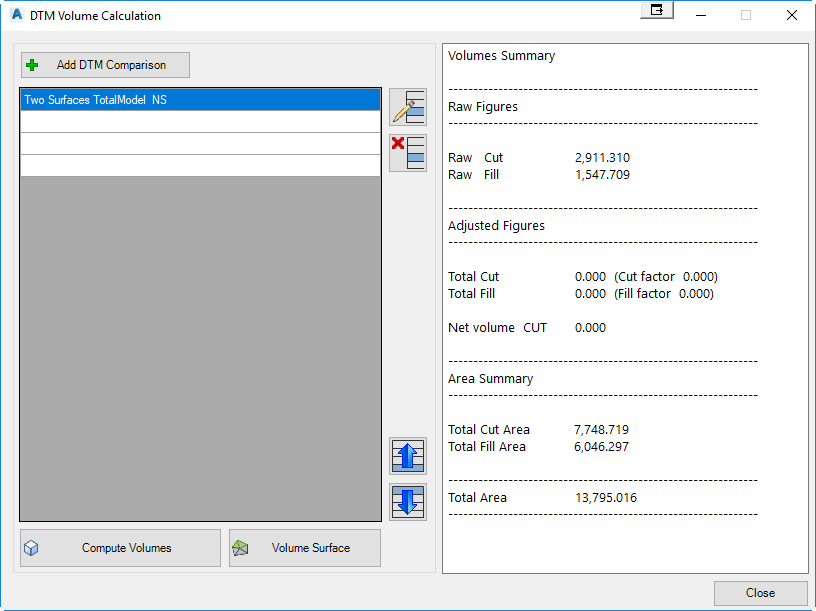 Notes: Left side list view displays Volume Comparisons for editing and output Right side view displays Output Volume information for the selected comparison - this data can be selected and copied. |
|||||||||||||||||||||||||||||
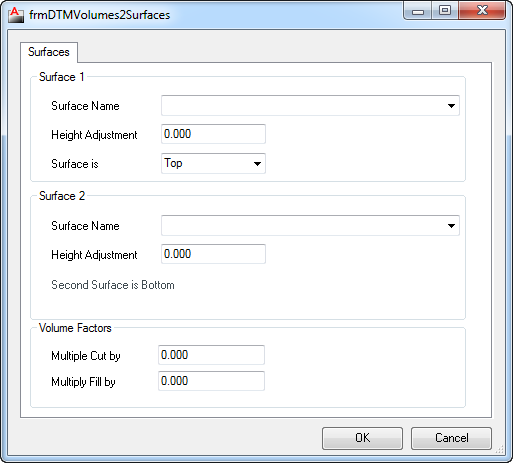
Adds a new volume entry comparing two
surfaces. Inputs are as follows:
|
|||||||||||||||||||||||||||||
| Volume Comparison List | The left panel list view displays all Surface (DTM) Comparisons that have been created. Select one in order to edit or output. | ||||||||||||||||||||||||||||
| Calculates the selected Volume Comparison and outputs information to Output Volume Information panel (right side of form). | |||||||||||||||||||||||||||||
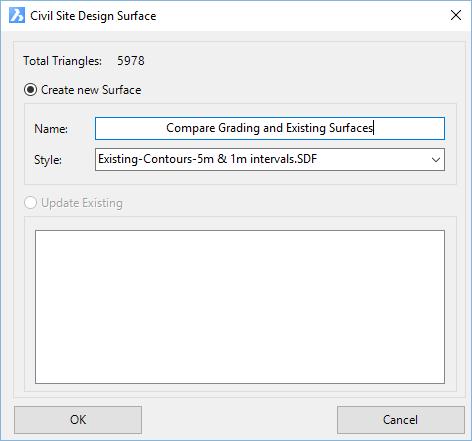
Using the Volume Surface command,
users can output a Civil Site Design Surface. The surface
created is an isopach surface, which can be used to shade in areas
of cut/fill via the Create/Edit Surface dialog.
|
|||||||||||||||||||||||||||||
 Edit Entry
 |
Edit the selected (highlighted) volume comparison entry. The editing form will display for the volume comparison entry and matches the create volume comparison entry (above). | ||||||||||||||||||||||||||||
 Move Up Move Up |
Move a selected (highlighted) volume comparison up in the list. | ||||||||||||||||||||||||||||
 Move Down Move Down |
Move a selected (highlighted) volume comparison down in the list. | ||||||||||||||||||||||||||||
 Delete
Entry Delete
Entry |
Delete the selected (highlighted) volume comparison. | ||||||||||||||||||||||||||||
| Volume Output Information Panel | The right panel view displays volume
information for the selected volume comparison. The
list is generated and updated upon selecting a Volume comparison
and clicking on This data is able to be copied and pasted to any text based editor. |
||||||||||||||||||||||||||||
 |
Close form and return to the drawing. This is not a modeless form, it must be closed before work can continue in the drawing. The Windows Red-X may also be used. | ||||||||||||||||||||||||||||