WC3 Output
Icon: |
|
Introduction
WC3 is a software service providing comprehensive embodied carbon calculations for civil infrastructure. This command exports civil design data to the WC3 format for carbon footprint analysis. Users can review and edit pavement layers, edging, pipes, and pits before exporting to a JSON format for carbon calculation.
Usage Workflow
1. Review Pavement Layers: Check the pavement layers tab, verify material selections, and edit dimensions as needed.
2. Configure Edging: Decide if edging should be separated from pavement via the "Separate Edging" checkbox and verify materials.
3. Review Pipes and Pits: Check the pipes and pits tabs for accuracy regarding materials and quantities.
4. Set Earthworks/Haulage Parameters: Select fuel sources, transport modes, and enter distances to suppliers and disposal sites.
5. Export: Click "Export" to generate the JSON file for the WC3 Carbon Calculator.
Best Practices
• Review all data before exporting.
• Verify material selections match project specifications.
• Use accurate measurements for lengths, widths, and thicknesses.
• Set realistic distances for haulage calculations.
• Keep a backup of exported JSON files.
Details
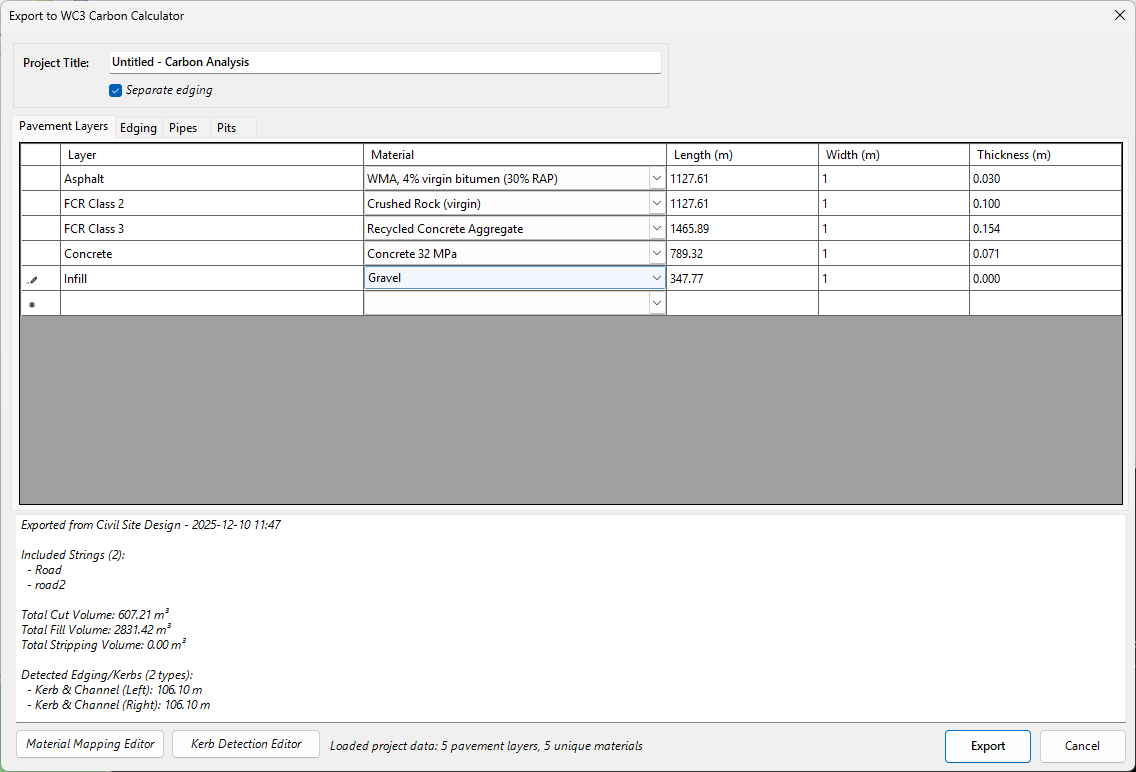
Upon selecting the command the following form is displayed:
|
|
|||||||||||||||||||||||||||||||||||||||||
|
Project Information |
Top of form | ||||||||||||||||||||||||||||||||||||||||
|
Project Name |
Identifies the project in the export file. Default: "[String Name] - Carbon Analysis". | ||||||||||||||||||||||||||||||||||||||||
|
Separate Edging |
Checkbox. If checked, edging is calculated separately. If unchecked, edging is included in pavement calculations. | ||||||||||||||||||||||||||||||||||||||||
|
Tab 1: Pavement Layers |
Review and edit pavement data | ||||||||||||||||||||||||||||||||||||||||
|
Pavement Grid |
Displays layers with columns for Layer Name, Material, Length, Width, and Thickness. • Add/Remove rows for additional layers. • Select materials from the WC3 library. • Values are editable and calculations update automatically. |
||||||||||||||||||||||||||||||||||||||||
|
Tab 2: Edging |
Review and edit edging data | ||||||||||||||||||||||||||||||||||||||||
|
Edging Grid |
Displays edging items with columns for Item, Material, Area, and Length. • Select materials from the WC3 library. |
||||||||||||||||||||||||||||||||||||||||
|
Tab 3: Pipes |
Populated from pipe networks | ||||||||||||||||||||||||||||||||||||||||
|
Pipes Grid |
Displays pipe data with columns for Item, Material, Length, and Mass/m. • Mass calculations based on length and mass per meter. |
||||||||||||||||||||||||||||||||||||||||
|
Tab 4: Pits |
Populated from pipe network structures | ||||||||||||||||||||||||||||||||||||||||
|
Pits Grid |
Displays pit data with columns for Pit ID, Type, Material, and Quantity. • Quantity tracking for carbon calculations. |
||||||||||||||||||||||||||||||||||||||||
|
Action Buttons |
Bottom of form | ||||||||||||||||||||||||||||||||||||||||
|
Material Mapping |
|
||||||||||||||||||||||||||||||||||||||||
|
Kerb Detection Editor |
|
||||||||||||||||||||||||||||||||||||||||
|
Export |
Checks all required fields and exports data to a JSON file in WC3 format. | ||||||||||||||||||||||||||||||||||||||||
|
Cancel |
Closes the form without saving or exporting. |
||||||||||||||||||||||||||||||||||||||||