Excel Link
Icon: |
|
Introduction
Any Excel file with relevant data inputs and structures can be set up (Linked) to edit design components in Civil Site Design. It is usual, but not required, that Excel Export is run to create a structured Excel files for reading into Civil Site Design.
This command creates a Link between columns and rows of data in the Excel file and design components of the current design project, enabling full spreadsheet design.
Once an Excel Link is established, edits made to the Excel file/s (either by using Excel or by using the Excel Edit command) can link back to the design by using the Sync Links command.
For a successful Link to be created, users must:
-
Select an Excel file with appropriately structured (column controlled or row controlled) data with suitable inputs
-
Select the Sheet containing the required design data
-
Set the starting cell and direction (eg: data is arranged by column or row) for each design data input required and set what data component this represents.
-
Repeat the above for each Sheet and each column (or row) of design data that is to be controlled by the Sheet
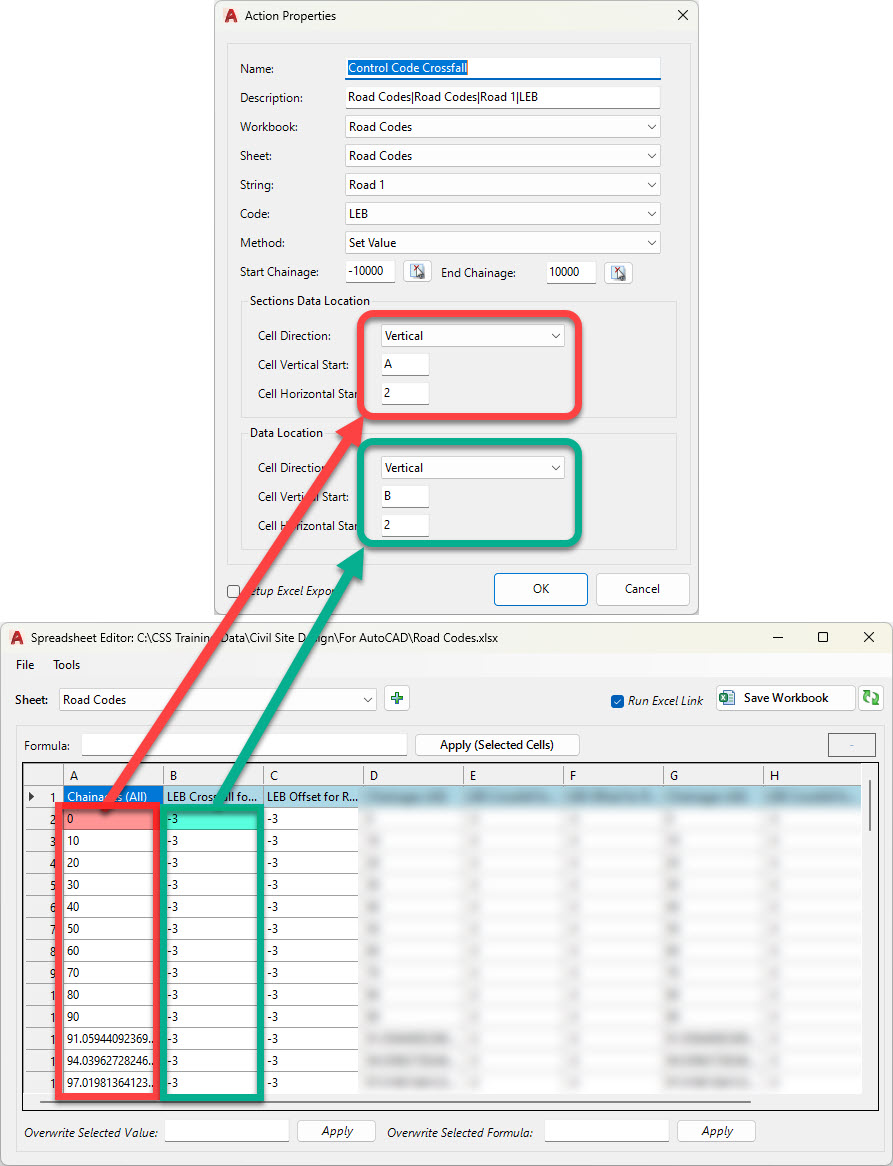
As an example, if mapping between an Excel Sheet and, say, the crossall of a Code for a String, there needs to be two columns (or rows) of data - one being the chainages and the other the crossfalls. The linking process would include setting the starting cell of each input and matching this to the String and the Code to control. An example of this setup is shown below - the Excel Link Action is shown on the left and the corresponding spreadsheet (viewed using the Excel Editor) shows how to match up the data.
Using Excel Link to Create an Excel Export file
Excel Link can also be used to CREATE an Excel file and enable immediate spreadsheet editing of the design. This will automatically create an Excel Export, saving time and effort matching up the sheets, workbooks, columns and rows to read from the design and write back to the design.
To have Excel Link create an Excel Workbook and Sheet/s when adding a Workbook choose the Create New option (instead of opening an existing workbook) then create a Sheet to add design controls to.
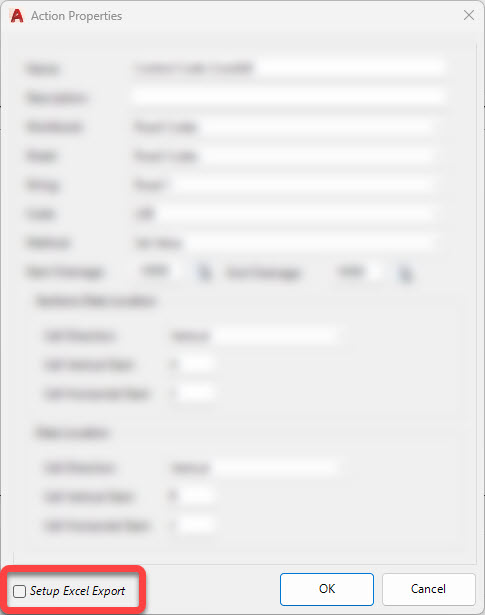
When adding Actions (building links between the Excel Sheet cells and the design component) click on Setup Excel Export to create an Excel Export and build an Excel file for the link.
This is by far the easiest way to create a Linked Excel Workbook and Sheets.
Linking to an Existing Excel Workbook and Sheet
It is highly recommended to have the Excel file open when building the Link, to quickly identify the starting Cell for each design component to input for the link.
Note: the same Excel column (or row) of data can be used to edit multiple design components. An example of this is the creation of a link to the width of a Code - for a particular String the same column of data could be used and applied to both the left hand side Code and the right hand side Code.
SPECIAL NOTE - Editing 'Design Data' type Excel file and adding new Data
It will be common to add new Variations, Templates, Batter Overrides and other Design Data edits via an Excel workbook.
When Excel Export is used to export Design Data, every entry added is given an INDEX - this is a unique number describing the order (position) of the entry in the Design Data form.
If adding extra Design Data, there are some critical things to get right:
-
The first column is the Type of Design Data entry and must match with the accepted inputs (these are what the software recognises as a valid Design Data control) - the best way to confirm is to create an entry of the type required then create and Excel Export and review the contents
-
the second column is the INDEX - this establishes the order of the entry in the list. It is critical that the Index is unique, 1 is the first entry in the list and the index is edited in order (so the second item in the list should be set as Index 2, etc)
-
The other columns to the right represent the user inputs for the design data entry, in order of input in the form. The inputs will differ per Design Data input type
An Example - Variations
In the example below, 5 variations have been added to a design string and then exported to Excel: 2 linearly varied codes, one matching a code to the surface, one to delete a code, and one to delete all codes outside of a selected code. Shown on the left is the Design Data form, and shown on the right is the Excel Export:
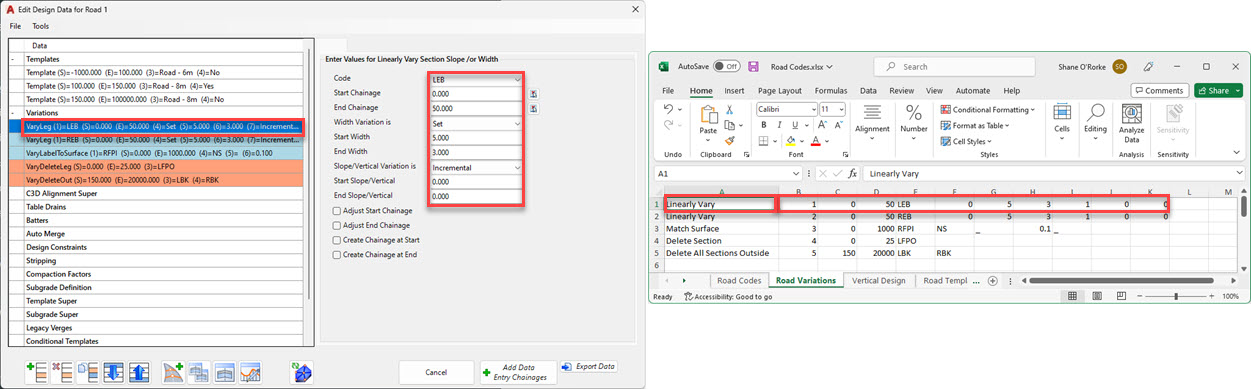
Highlighted in the first entry in the Design Data form. Note the cell B1 in Excel has the number 1 - that is the INDEX and sets this as the first Variation in the Variations list.
When editing the Excel file:
-
Understand the output cells and what values they represent
-
When making edits, match the format and intent of each cell (number for a numeric input like Chainage, characters for inputs such as Code or Alignment or Surface)
-
Only input valid inputs. Adding a Surface name that doesn't exist will still add the Variation but it will be disabled because that named surface doesn't exist
-
The INDEX can be reordered. To put the VaryDeleteLeg FIRST in the Variation list, it is required to set this as INDEX 1 and reorder the rest
:
-
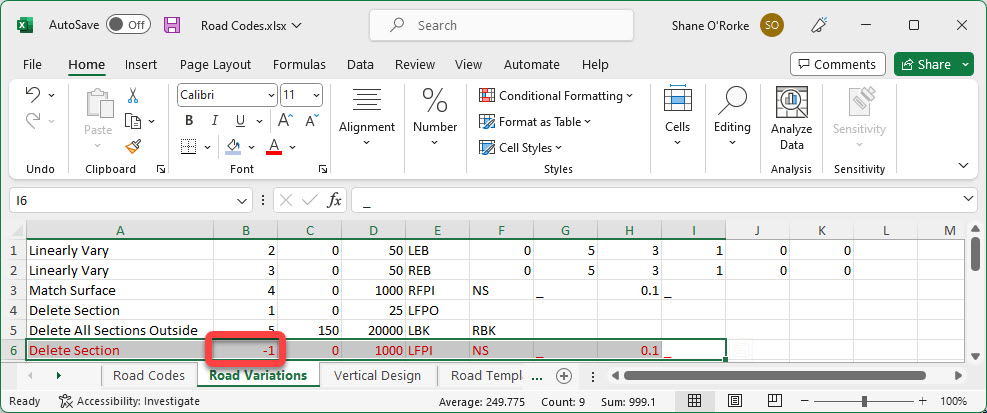
NEW Variations can be added. These must be assigned an INDEX of -1. When imported into Civil Site Design, the software will add it to the Design Data form.
NOTE: If you run Sync Links multiple times with the file input showing -1, then that entry will be repeatedly added. Index of -1 is set to ADD NEW entry. It is highly recommended to re-run the Excel Export in this case to update the Excel spreasheet, then edit or add more entries
Details
Upon selecting the command the following form is displayed:
|
|
|||||||||||||||||||||||||||||||||||||||||||||||||||||||||||
|
File > Import Action List |
Import a saved action list. Pick the export file to
include. After picking a file the Add Actions form
will display with only the following inputs enabled: - String/Alignment - Code - Surface Additional Actions will be added from the file being imported and assign the String/Alignment, Code and Surface selected. |
||||||||||||||||||||||||||||||||||||||||||||||||||||||||||
|
File > Export Action List |
Create a saved Action List using the actions listed. At the prompt, pick the save location and save file name. | ||||||||||||||||||||||||||||||||||||||||||||||||||||||||||
|
|
A Workbook is an Excel (.xlsx) file. Multiple Workbooks can be included for creating Excel Links. | ||||||||||||||||||||||||||||||||||||||||||||||||||||||||||
| Workbooks picklist | Pick a Workbook to edit or add Actions to | ||||||||||||||||||||||||||||||||||||||||||||||||||||||||||
|
|
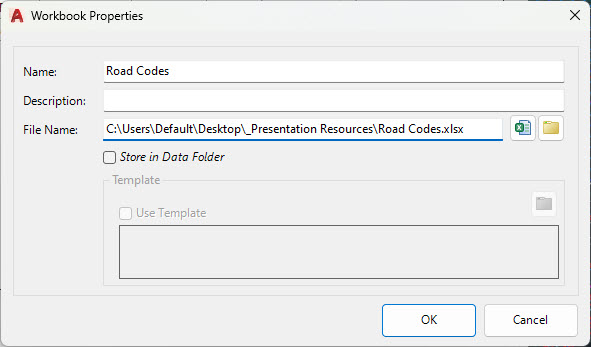
Create a new Workbook or select an existing Workbook to
append Sheets to and create Sheets from. The following form will display:
|
||||||||||||||||||||||||||||||||||||||||||||||||||||||||||
|
|
Deletes the current Workbook. Created Excel files are not deleted | ||||||||||||||||||||||||||||||||||||||||||||||||||||||||||
|
|
Opens the Add Workbook form to select a different Workbook to include | ||||||||||||||||||||||||||||||||||||||||||||||||||||||||||
|
|
Opens the spreadsheet for editing with Excel Edit. | ||||||||||||||||||||||||||||||||||||||||||||||||||||||||||
|
|
Opens the .xlsx file - if Excel (or other default application set to open .xlsx files) is installed on the computer, then it will open for editing in Excel (or equivalent) | ||||||||||||||||||||||||||||||||||||||||||||||||||||||||||
|
|
Sheets are part of an Excel Workbook (tabbed sheets in an Excel file). These can be created and edited here, and will update the selected Workbook. By default, new Sheets are added to the currently selected Workbook. | ||||||||||||||||||||||||||||||||||||||||||||||||||||||||||
| Sheet picklist | Pick a Sheet to edit or add Actions to for updating the design. | ||||||||||||||||||||||||||||||||||||||||||||||||||||||||||
|
|
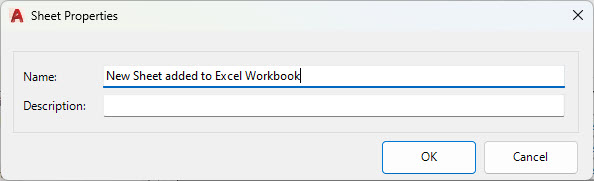
Create a new Sheet or select an existing Sheet to
append Actions to. The following form will display:
|
||||||||||||||||||||||||||||||||||||||||||||||||||||||||||
|
|
Deletes the current Sheet. The Sheet in the Excel file will be deleted. | ||||||||||||||||||||||||||||||||||||||||||||||||||||||||||
|
|
Opens the Add Sheet form to select a different Sheet to include | ||||||||||||||||||||||||||||||||||||||||||||||||||||||||||
|
|
Updates the Sheet contents for any changes | ||||||||||||||||||||||||||||||||||||||||||||||||||||||||||
|
Available Actions |
Add Link Actions to the Actions list | ||||||||||||||||||||||||||||||||||||||||||||||||||||||||||
|
Available Actions list |
Lists all Design Data that can an Excel Link can be created
for. Double click to add an action or select and click on the Add Action button. |
||||||||||||||||||||||||||||||||||||||||||||||||||||||||||
|
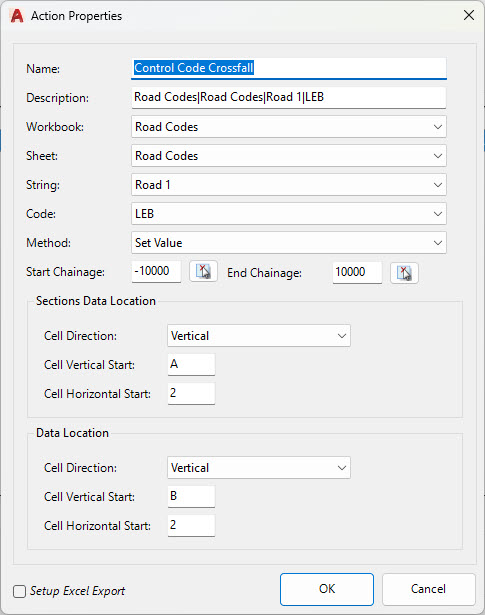
Sectional Actions |
Lists all the sectional data that can be linked to Excel.
After selecting a Link Action from the list to add to the Sheet, the following form displays:
|
||||||||||||||||||||||||||||||||||||||||||||||||||||||||||
|
Vertical Profile Actions |
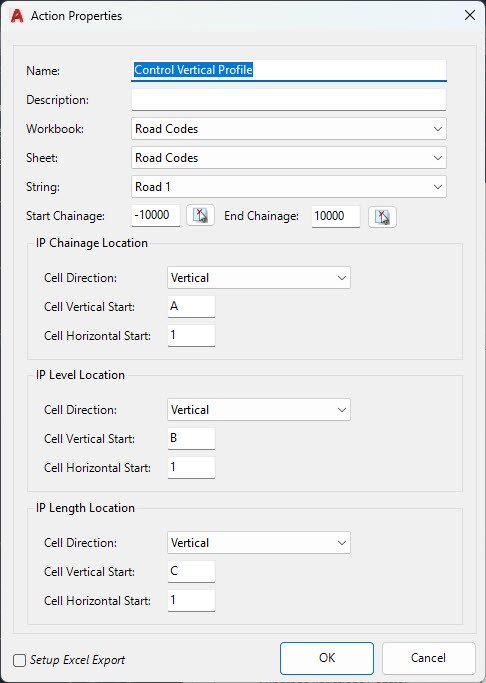
Lists all the vertical grading properties that can be linked
to Excel. After selecting a Link Action from the list to add to the Sheet, the following form displays:
|
||||||||||||||||||||||||||||||||||||||||||||||||||||||||||
|
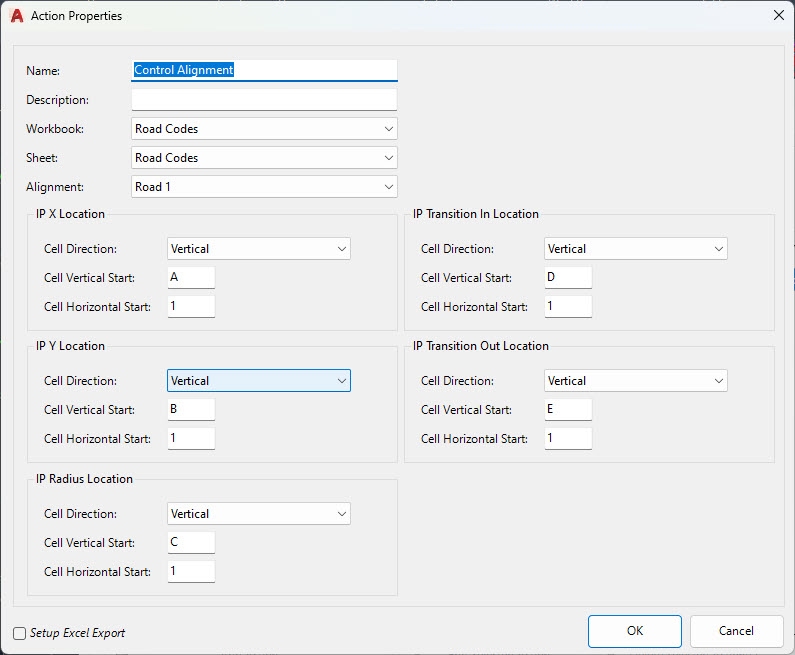
Alignment Actions |
Lists all the Alignment properties that can be linked to
Excel. After selecting a Link Action from the list to add to the Sheet, the following form displays:
|
||||||||||||||||||||||||||||||||||||||||||||||||||||||||||
|
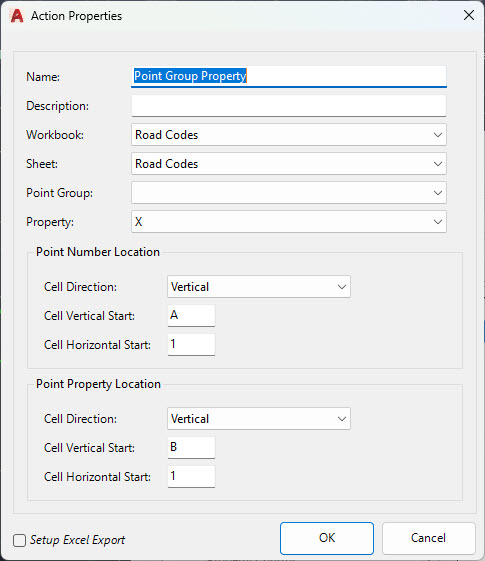
GOGO Point Actions |
Lists all the COGO Pointproperties that can be linked to
Excel. After selecting a Link Action from the list to add to the Sheet, the following form displays:
|
||||||||||||||||||||||||||||||||||||||||||||||||||||||||||
|
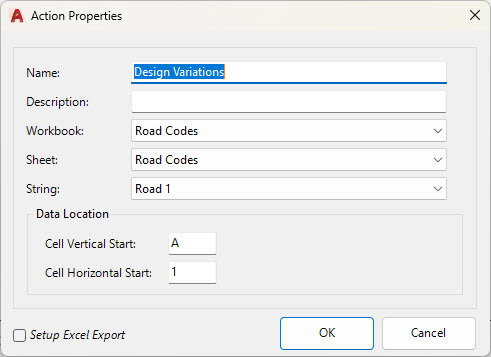
Design Data Actions |
Lists all the Design Data form properties that can be linked
to Excel. After selecting a Link Action from the list to add to the Sheet, the following form displays:
|
||||||||||||||||||||||||||||||||||||||||||||||||||||||||||
|
|
Select a Link Action type and click to add the Link Action. The form displayed is subject to the Link Action type, as described above. |
||||||||||||||||||||||||||||||||||||||||||||||||||||||||||
|
Link Actions list |
Lists all actions to be applied to the Excel Sheets. These will add columns and/or rows of design information in the selected Excel sheet/s. | ||||||||||||||||||||||||||||||||||||||||||||||||||||||||||
|
Name |
Lists the name given to the Action | ||||||||||||||||||||||||||||||||||||||||||||||||||||||||||
|
Description |
Lists the description given to the Action | ||||||||||||||||||||||||||||||||||||||||||||||||||||||||||
|
Update |
Information. What actions result in an Update of the design data by re-reading the Excel Link Sheet/s. | ||||||||||||||||||||||||||||||||||||||||||||||||||||||||||
|
Edit Selected Action |
Opens the relevant form for the selected Link Action, with inputs described as above. | ||||||||||||||||||||||||||||||||||||||||||||||||||||||||||
|
Delete Selected Action/s |
Deletes the highlighted Link Action/s in the list. | ||||||||||||||||||||||||||||||||||||||||||||||||||||||||||
|
Override Sheet(s) |
Overrides the assigned Sheet for the highlighted Action/s in the list, using the currently selected Sheets. | ||||||||||||||||||||||||||||||||||||||||||||||||||||||||||
|
Run Excel Link |
Updates all Design components as per the Links established between the Sheets and the object properties to adjust. | ||||||||||||||||||||||||||||||||||||||||||||||||||||||||||
|
Close |
Close the form | ||||||||||||||||||||||||||||||||||||||||||||||||||||||||||