Drape Objects
Icon: |
|
Introduction
Projects 2D CAD entities (lines, polylines, etc.) onto a 3D surface, creating 3D geometry that follows the surface topography. This is useful for draping design elements like centrelines or boundaries onto terrain surfaces.
Usage Workflow
1. Select Surface: Open the Surface Drape form and select the target surface. Click Refresh if needed.
2. Choose Selection Mode: Select "By Layer" to process an entire layer, or "By Selection" to manually select objects later.
3. Configure Drape Settings: Enter the sample interval (typically 1.0 to 2.0) and a target layer name. Choose whether to keep or edit original entities.
4. Run Drape Operation: Click "Run". If in "By Selection" mode, select objects in the drawing. The status window will show progress.
5. Review Results: Check the status window for the success count and verify the draped entities in the drawing.
Best Practices
• Use smaller sample intervals for curved entities.
• Use larger sample intervals for straight entities.
• Test with a small number of objects first.
• Keep original entities until satisfied with the results.
• Use separate target layers for different entity types.
Details
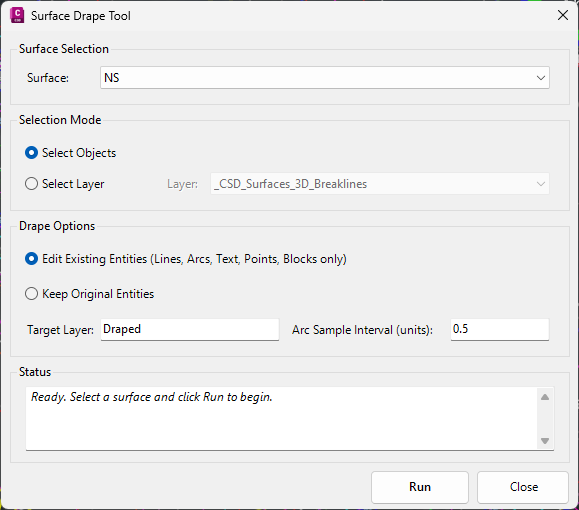
Upon selecting the command the following form is displayed:
|
|
|
|
Surface Selection |
Top of form |
|
Surface Dropdown |
Select the target surface for draping. Lists all available surfaces in the project. Must select exactly one valid surface. |
|
Selection Mode |
Middle of form |
|
Select Layer (Radio) |
Select all objects on a specific layer. Enables the Layer Dropdown. Useful for processing many objects at once. |
|
Select Objects (Radio) |
Manually select objects to drape. Disables the Layer Dropdown. User is prompted to select objects in the drawing after clicking Run. |
|
Layer Dropdown |
Select which layer to process (Default: Layer 0). Only enabled when "By Layer" is selected. |
|
Drape Settings |
Lower middle of form |
|
Edit Existing Entities |
Modify original entities to 3D instead of creating duplicates. |
|
Keep Original Entities |
Toggle to preserve original 2D entities. |
|
Target Layer |
Layer where draped entities will be placed. The layer is created if it doesn't exist. User must enter a valid name. |
|
Arc Sample Interval |
Distance between sample points along arc sections. |
|
Status Window |
Bottom of form |
|
Status Text Box |
Shows operation progress and results in real-time (entities processed, success/fail counts, entity types). |
|
Action Buttons |
Bottom of form |
|
Run |
Starts the drape operation. Validates inputs and processes selected entities. |
|
Close |
Closes the form and returns to the drawing. |