Add High/Low Points
Icon: |
|
Introduction
Places COGO Points at string point locations in a model.
This command allows users to mark specific points (high points, low points, or all points) with blocks based on the sampling of selected codes from the model.
Usage Workflow
1. Select Model: Open the form and select a model (or "TotalModel") to view available codes.
2. Select Codes: Check the specific codes you wish to include from the list.
Multiple codes can be selected and toggling on/off will apply to all highlighted
rows.
3. Configure Point Style: Select the Point Style and an optional code set table.
4. Choose Point Types: specific if you want High Points, Low Points, or All Points included.
5. Set Tolerance: Enter the distance tolerance (default: 0.001)
to detect low and high points.
6. Assign Code: Enter the code that will be assigned to the placed blocks.
7. Process: Click the "Process" button to generate the blocks.
Best Practices
Use a point code that will not be added to a surface unless required
The fastest way to delete all points within a poin group is to use the Point Groups command button on the form. Highlight all points, click Options > Delete
Use an appropriate tolerance relative to how flat your site is to limit detection of multiple low points.
Test with a single code first before processing complex models.
Details
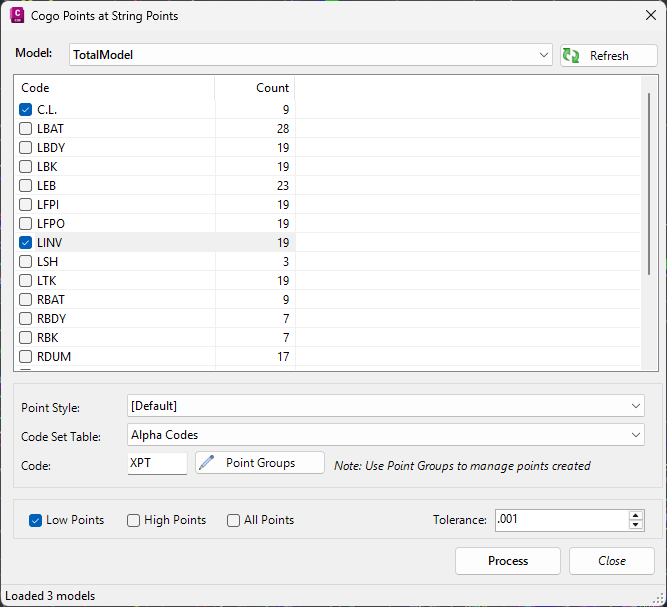
Upon selecting the command the following form is displayed:
|
|
|
|
Model Selection |
Top of form |
|
Model Dropdown |
Select which model to process. "TotalModel" represents combined data. This selection determines which codes are populated in the list below. |
|
Refresh Models |
Reloads the model list. Use this if you have added new models to the project while the form is open. |
|
Code Selection |
Middle of form |
|
Code List View |
Displays available codes (e.g., "TOP", "TOE") and the count of points for each. Check the boxes to include/exclude specific codes in processing. |
|
Context Menu |
Right-click the list for bulk operations: Select All, Clear All, or Invert Selection. |
|
Point Style |
Lower middle of form |
|
Point Style Dropdown |
Select the visual appearance (size, colour, shape) for the placed blocks. A style must be selected. |
|
Code Set Table |
Optional. Maps codes to specific block properties. Can be left empty. |
|
Code Assignment |
Bottom of form |
|
Code Text Box |
Enter the code (e.g., "MARKER") to assign to the placed blocks. This is a required field. |
|
Point Groups |
Opens the Point Groups form. |
|
Point Type Selection |
Lower middle of form. At least one type must be selected. |
|
Low Points |
Checkbox. When checked, marks the lowest elevation points in each section. |
|
High Points |
Checkbox. When checked, marks the highest elevation points in each section. |
|
All Points |
Checkbox. When checked, marks all points regardless of elevation. |
|
Tolerance |
Distance tolerance for high/low point detection |
|
Status Bar |
Bottom of form |
|
Status Label |
Shows real-time operation updates, including models loaded, blocks created, and error messages. |
|
Action Buttons |
Bottom of form |
|
Process |
Validates inputs and places blocks at the selected string point locations. |
|
Close |
Closes the form. |